Houlet's Nest - Clutter Island!

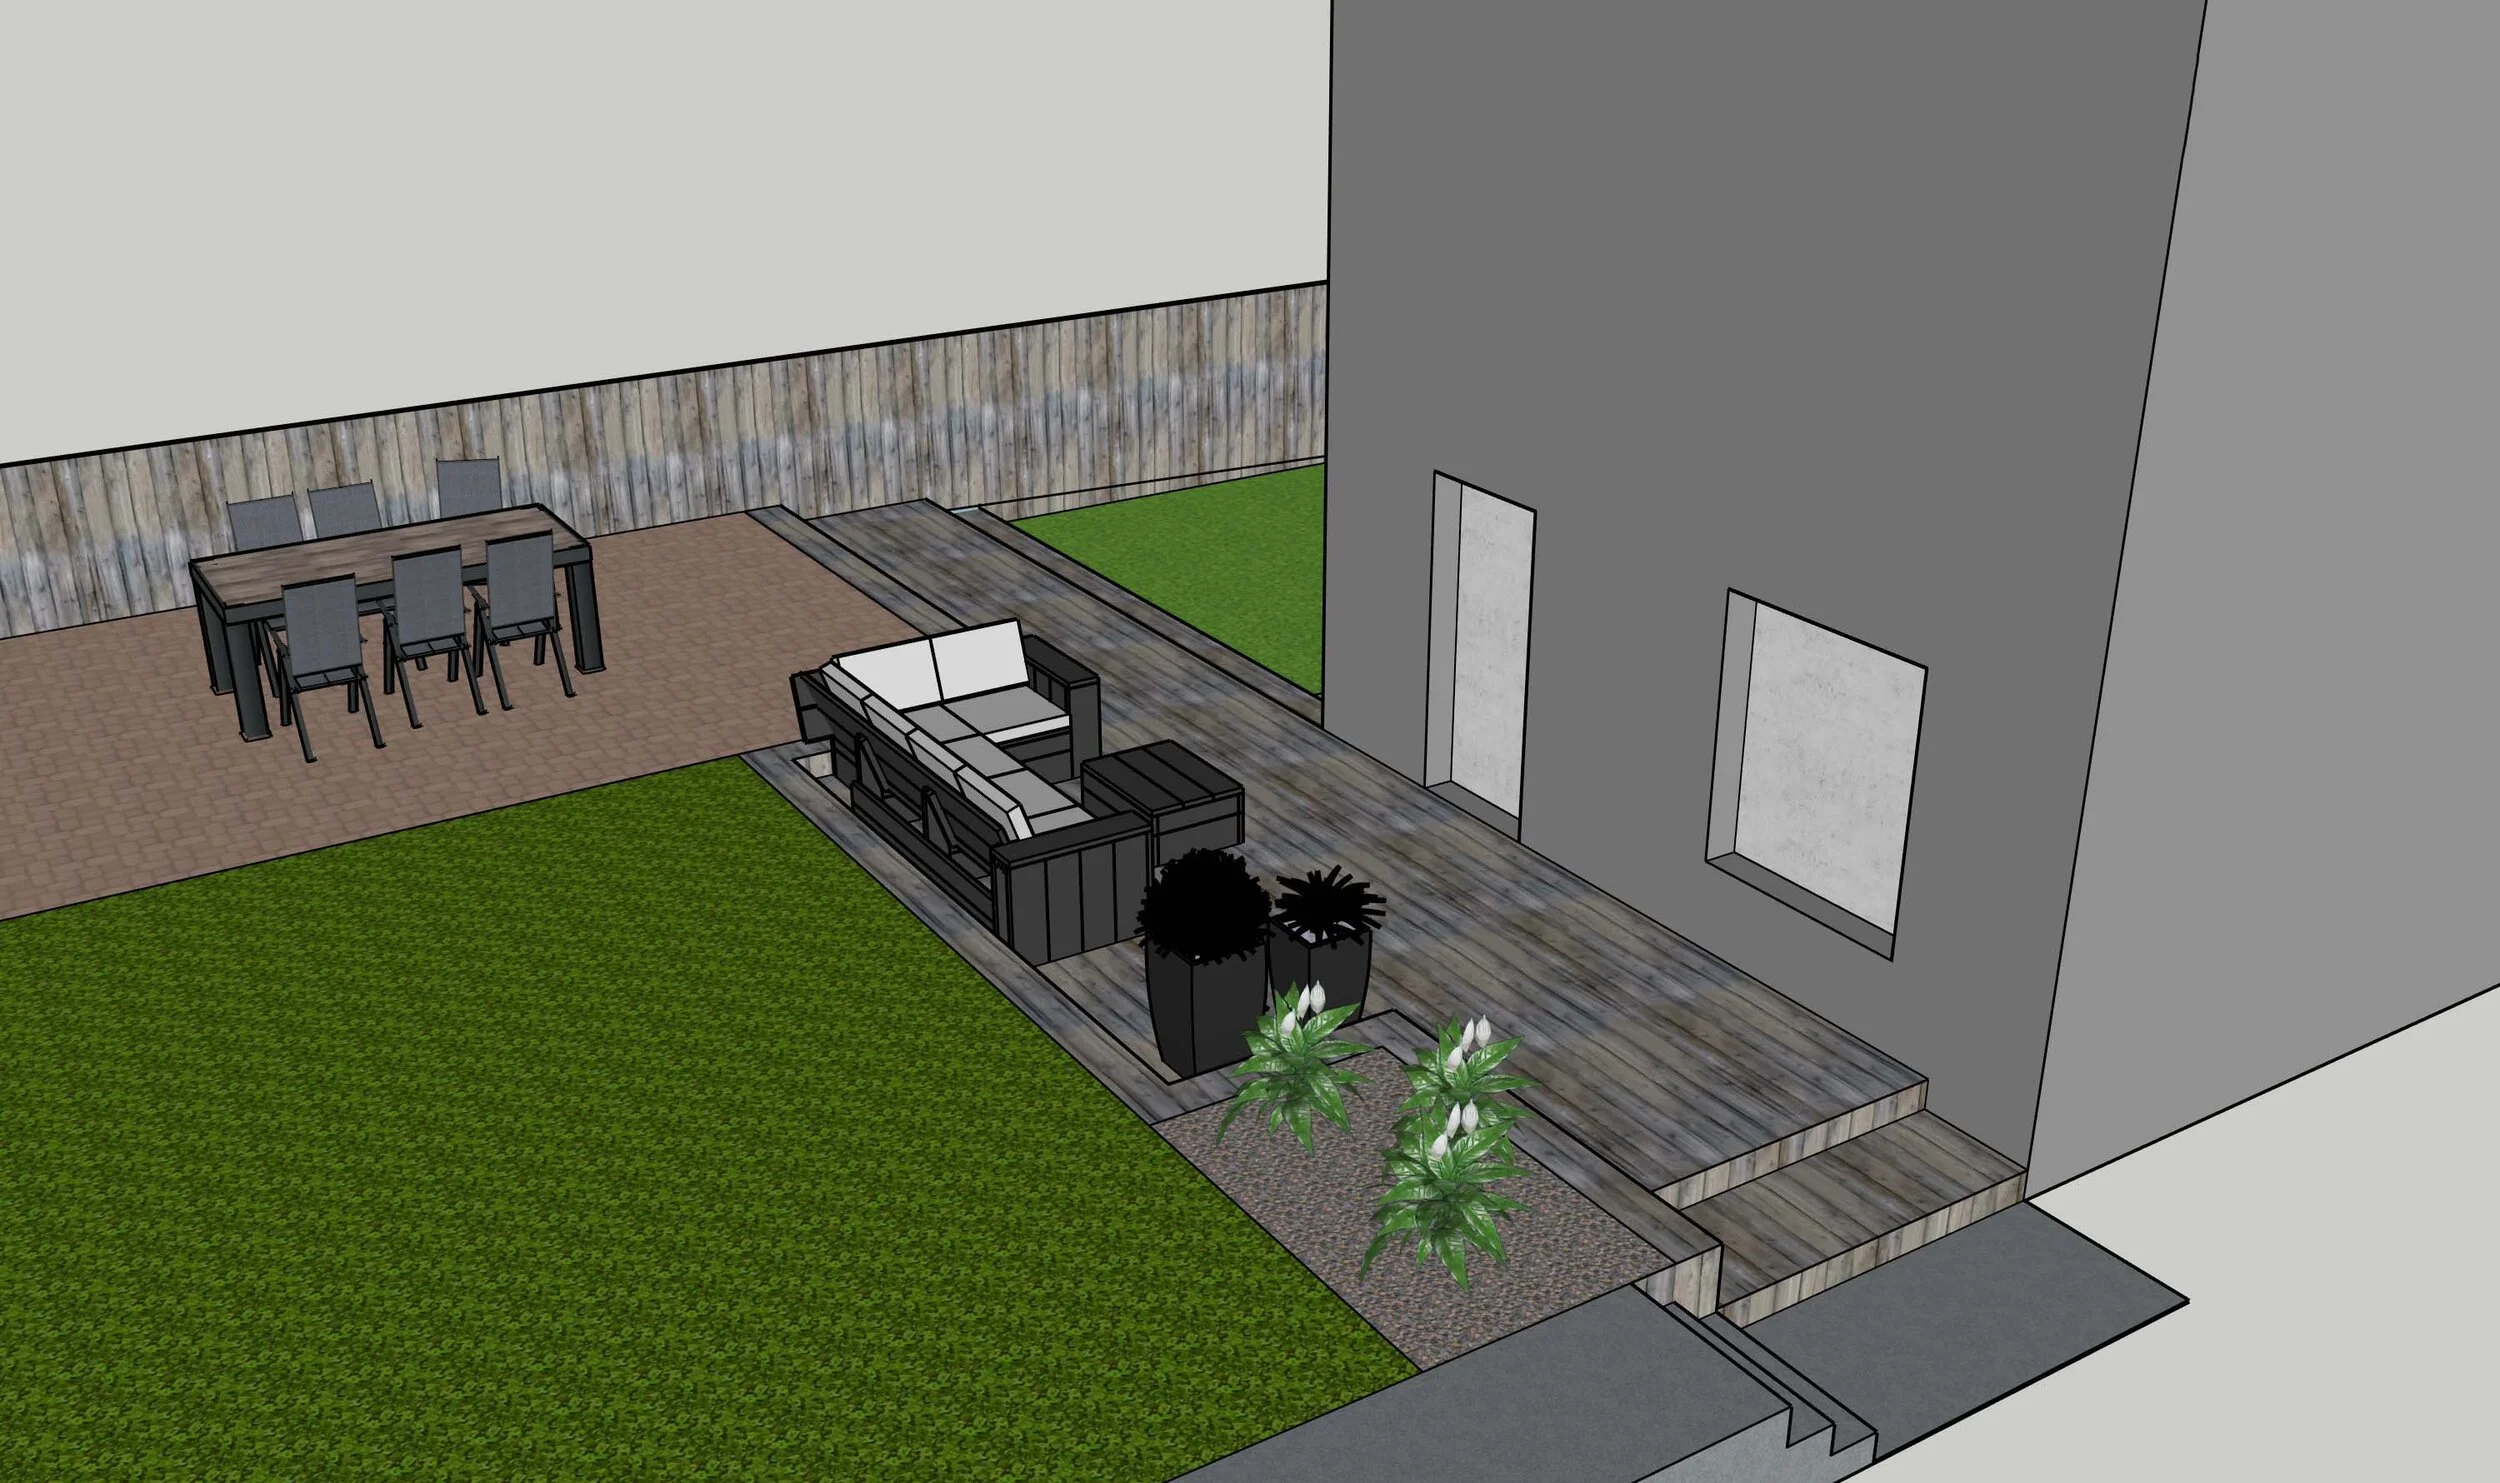
Following on from our ‘Garden Renovation’ background and project planning post the other week we are now going to document how we went about starting work on our garden (We’d recommend you read the previous article before this one if you haven’t already).

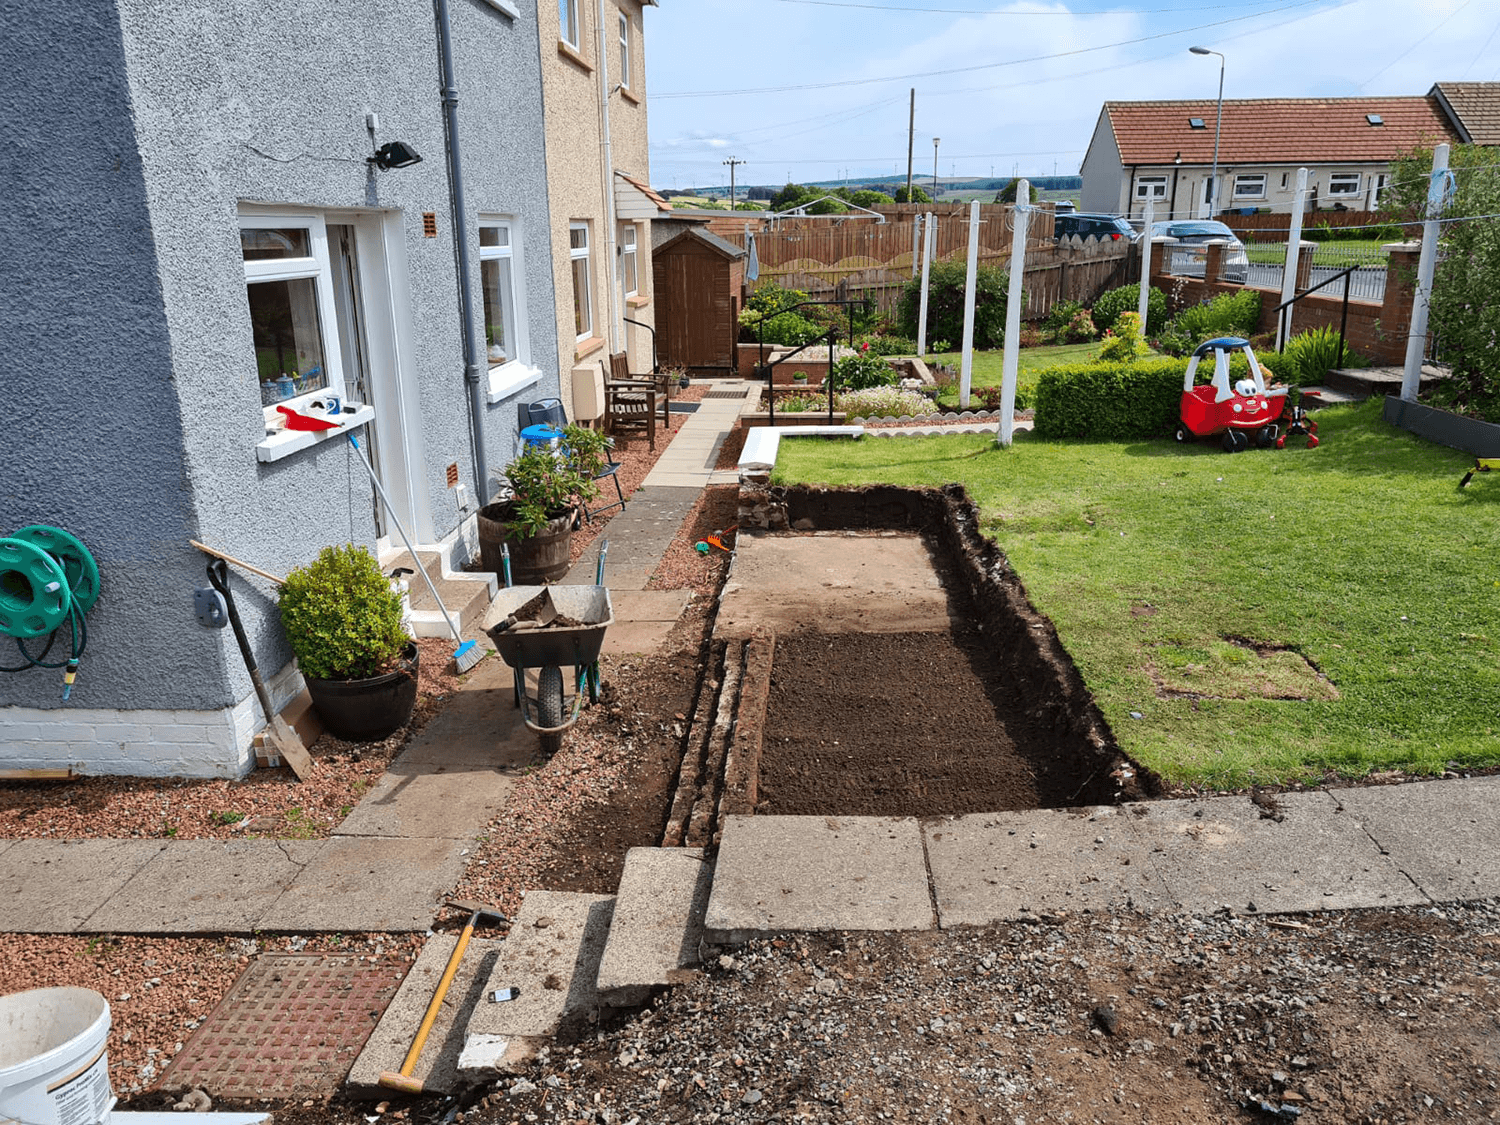
Lorna and Norrie went back and forth on how best to attack the plans for the new layout and it was decided we would clear the site as best as possible - getting rid of a lot of concrete, slabs and blocks whilst also cutting out a section of the grass area which would eventually be part of the decking space.

Clutter Island!

The first stage therefore was to clear the site of as much rubbish as we could. We did not fathom there to be quite as much clutter and sheer tonnage as there turned out to be. It just kept coming!

Neil broke up all the concrete in the garden as best he could and shifted it to the side of the driveway in anticipation of ordering a skip.

Demolition Driveway

Neil and Norrie added to the concrete by demolishing the driveway of all slabs and edging stones to uncover the earth below. As the pictures show there is still a long way to go in terms of setting out levels and creating the depth for a retaining wall at this stage.

We hired a skip for a week and proceeded to fill it with an assortment of rubble, soil and wood. We perhaps over filled it in the end and the skip company perhaps wasn’t best pleased with the weight.

Skip 1 getting filled.png

Neil and Norrie also took to the grass section which is to be replaced by decking. This involved taking down the surrounding wall and digging to floor level.

This task made us aware of the clothes pole, which you can see just above the grass cut out in the picture below, and we decided it would need to come down sooner than expected as it was in the way.

Some of the soil from the dig we put in the skip, the rest we put behind the shed at the side of the garden.

Pole Chancer

Lorna’s dad, Jim, kindly made himself available one day to help with the removal of the clothes pole. He and Neil worked for a couple of hours, at least, digging and drilling into the concrete block at the bottom of the clothes pole. It was tough and a bit of a nightmare job considering it was one clothes pole that they were trying to remove.

When their hard work looked to be paying off and the pole started moving around… up stepped Lorna to pull the thing out the hole! Jim and Neil watched on exhausted as Lorna took the glory.

Tree Roots

The digging around the driveway, grass section and clothes pole unearthed a bit of a problem for the job moving forward. Tree roots…

Tree roots.png

The job was not going to move forward until we dealt with this problem. Thankfully, friends of ours, David and Pamela Hutchison, put us in touch with Ronnie Barker who came out one Sunday to investigate. He then set us up with a stump grinder and operator.

Our next blog article will cover our suppliers to date so we will reveal how the stump was taken away next post.

Next post….Site Levels, Spreadsheets and Suppliers

Having agreed on the layout of the new garden and having made a start at clearing the site we were keen to break the job down into stages and to research potential suppliers for each section of the renovation. Neil made an excel spreadsheet that looked to keep tabs on and cover every cost of the job, from skips required to stump grinders to decking and paving blocks.

We quickly realised our budget was going to be very tight, if not unrealistic, but it gave us a target to try and stay near to at least!

We will share all next blog post.

Houlet's Nest - Garden Renovation

Following on from our house tour video on YouTube, the Covid-19 lock-down months of March to June has seen us reconfigure our plans slightly.

Our daughter, Luna, turned 2 years old during this time and her energetic nature had us worrying about our garden’s safety! It sounds silly but we didn’t quite realise how unsafe the back garden was until our daughter started running about it regularly.

The garden was a great way to catch a breath during lock-down. Living with a 2-year-old inside 4 walls, 24/7 can become quite intense.

What were the aspects that bothered us into acting before doing our pre-made house improvements?

Side on of the Driveway and Walkway.jpg
  • Openness to the street. There was a lack of privacy and a danger of Luna running right onto the street. We also didn’t like the ease of access for strangers to enter.

  • The back garden had so many levels to it which is ideal for the wee climber that she is but it was not very safe if she was to fall or trip!

  • The back garden was unsightly and there were far too many things going on visually. We felt that all previous works were not done to a great finish and used too much concrete!

  • The clothes poles were massive, taking up a large part of garden, eye line and another threat to Luna running around.

  • We wanted the large side garden to tie in with the back garden better, allowing more room for Luna to play and it would allow us to show off the large plot of land for what it is rather than being cluttered and bitty.

  • Ultimately, we wanted the garden to look in keeping with the new style of house we are going to create.

Here are some more before images to show you what we were dealing with...

Overview - Clothes poles, road and grass area.jpg

This overhead shot (bit of window glare, sorry) not only shows a dry day in Eaglesham but it gives you an idea of the grass space, the massive clothes poles and gives a clear example of the openness to the road where Luna could just run out! 

Driveway.jpg

Not very pleasing to the eye, the driveway seems to have been a DIY job by one of the previous owners. Again, lots of potential danger for Luna here as you can see. Furthermore, look at the red fence on the left which doesn’t go with the colour of the building, the white of the clothes poles or white and grey of the garden decorations.

Tree Stump hiding under the ground!.jpg

Somehow before we started the project we missed the tree stump that this plant pot is sitting on. When we did find it, we did not reckon it would hinder the job quite so much as it did! Further blog posts will detail how we dealt with it.   

Connecting back to side Garden.jpg

This angle shows the driveway leading into the side garden space. You can see the shed on the right which tended to distort the eyeline as it was a large shed and very imposing. Our idea was to give Luna more playroom by taking away the various elements here and trying to form one continuous garden space. You can also see the red fence again which from this view you can see is very open to the public walking past.

Concrete Steps.jpg
Concrete and Luna.jpg

These two angles show you the unsightly nature but more importantly look at the potential for Luna hurting herself when climbing or running!

Backdoor Patio Drop Between Levels.jpg

This image shows the level between grass area and the back doorstep. This is not ideal and we decided decking would be a good idea to bridge the height gap, with only one 150mm step in between the back door and the grass.

Luna Crash Helmet.jpg

Outfit for every time Luna goes out in the garden?

Not very practical… so Lorna drew up plans to transform the back garden into a more secure, private and play friendly environment for the wee one. Not only that but she went about making an area us adults would like to spend our spare time in too!

Plans for the new garden layout

Garden Plan 1.jpg

As you can see there will be still be levels to the garden but in a much more calculated way with the rises reduced.

The shed will be removed and replaced later with a smaller storage unit. The driveway will maintain the level of the grass area and the fencing will be 1.5m. We have come up with a way to save money on this part of the job, we will cover this in a future blog post.  

Garden Plan 2.jpg
Garden Plan 4.jpg

Lorna has put in seating areas on both the driveway and outside the backdoor, this is up for discussion come the time the decking an driveway are in place. We are also looking to park our car in the driveway when not being used for family and friend gatherings so we will look to implement a bi-fold gate where the fence covers the current driveway opening in this drawing.

Garden Plan 3.jpg

We like the idea of growing our own vegetation and we have included a patch of land to do just that.

Garden Plan 5.jpg

The colour schemes are still to be decided too, we just wanted to make ourselves aware of the layout at this stage.

Garden Plan 6.jpg

The lack of clothes poles will mean more area to run around and plus the side garden will feel like a continuous part of the area.

Budget

We plan to do most of the work ourselves. Neil’s dad Norrie has offered to help us with his building experience which will keep costs down dramatically. The 3ds Lorna made helped us and Norrie to visualise the space and ensure we were all on the same page in terms of the design and stood as a good basis to help us decide on finishes and phasing the works.

This being said, not having any real experience of landscaping a garden, we set ourselves a very ambitious budget of £5,000.

We will let you know how we fared and give you an idea of the material and labour we needed to pay for in a future blog post.

next blog post…

As we have started the project, we are able to follow up this blog post quite quickly so it is my intention to post another update next week. You will be able to see how we started the project, what challenges sprung up and we will give you an idea of the suppliers we chose to use.

Sign up to our newsletter and we will let you know when we have added to the ‘Houlet’s Nest - Garden Renovation’ blog post series.

Covid-19 (Coronavirus) - Open for business

Video Chat, Calls And Emails

We may not be able to visit you in person in the coming weeks to discuss your project, but we are able to video chat to go through design options, discuss your next steps or to catch up on the status of your project.  Using Skype, Google Hangouts, Zoom or a preferable video sharing platform we can screen share to show you the 3D model of your project. For prospective customers we are happy to schedule introductory meetings using this method where we can establish your requirements and then follow up with a fee quotation for you to consider.

If you want to get in touch to arrange a video chat session please let us know and we can get a time in the diary neil@houletstudio.co.uk or lorna@houletstudio.co.uk

If you are more comfortable over the phone or via email we are available that way too!

Core Services Available To You

Work on all of our projects will keep progressing as our office is from home anyway. We can still work on models and drawings, prepare design options, and prepare Planning and Building Warrant applications during this time and we can deal with any technical queries as they arise.

It may be the case that building work may have to be postponed due to social distancing/isolating but we will be able to work on and get your project to a place where it will be ready to fly without delay when the situation turns a corner.

Hopefully this helps to assure you that we are in a position to continue with your project(s) but please feel free to contact either myself or Lorna if you want to discuss anything.

We hope that you and your family and friends continue to stay safe and we look forward to working with you through this difficult time.

Best regards,

Neil and Lorna